Discord Bot with Command Handler
Using NodeJs

Member @Developer DAO
Hello everyone 👋, I am Atharva Deshpande and this is my second article on developing discord bots.
In this article, we will understand how to use a command handler in a discord bot and the new slash commands. This article is built upon my previous article "Discord Bot with Slash Commands", hence it is recommended to go through it once.
This would be a very short and quick read as there aren't a lot many changes involved.
Here is the link to Github Repository. You can go ahead and get the code directly but I would recommend reading through the article once.
Note: Make sure you are on the
command-handlerbranch before cloning.
Prerequisites
Familiar with the process of creating bot in the developer portal.
Note: Do not forget to select
applications.commandswhile generating invite link.Any code editor. ( I would be using VSCode )
Basic understanding of Javascript
Machine with NodeJS v16.15.0 installed.
Quick read of Discord Bot with Slash Commands
Writing the code
Altering the structure a little bit. Create a new folder called
slashCommandsin the root directory of your project. Move thehello.jscommand inside the folder. Your updated structure should look like this.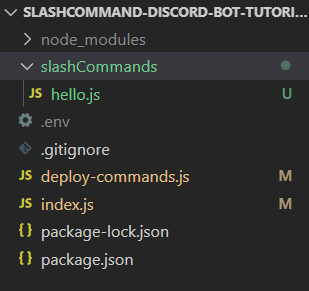
Changing the
deploy-commands.jsfileconst fs = require('fs') const { REST } = require('@discordjs/rest'); const { Routes } = require('discord-api-types/v9'); const commands = []; const commandFilesDir = [''] const deploySlashCommands = async (arrayDir) => { const rest = new REST({ version: '9' }).setToken(process.env.BOT_TOKEN); const applicationId = 'YOUR_APPLICATION_ID' const guildId = 'YOUR_GUILD_ID' arrayDir.forEach(dir => { const commandFiles = fs.readdirSync(`./slashCommands/${dir}`).filter(file => file.endsWith('.js')); for (const file of commandFiles) { const command = require(`./slashCommands/${dir}/${file}`); commands.push(command.data.toJSON()); } }) // This commented code should be uncommented if you want to deploy the commands globally in all the servers /* rest.put(Routes.applicationCommands(applicationId), { body: commands }) .then(() => console.log('Successfully registered application commands.')) .catch(console.error); */ // Comment this if you are deploying commands globally rest.put(Routes.applicationGuildCommands(applicationId, guildId), { body: commands }) .then(() => console.log('Successfully registered application commands.')) .catch(console.error); } deploySlashCommands(commandFilesDir);Replace the
applicationIdandguildIdvariables with the correct values. Here, we added a small loop to iterate over an array and fetch the file just like we used to do it before.arrayDir.forEach(dir => { const commandFiles = fs.readdirSync(`./slashCommands/${dir}`).filter(file => file.endsWith('.js')); for (const file of commandFiles) { const command = require(`./slashCommands/${dir}/${file}`); commands.push(command.data.toJSON()); } })We are passing an array when calling the function
deploySlashCommands(commandFilesDir)This
commandFilesDiris defined at the top with a blank entry like[''], indicating that the commands are directly located inside theslashCommandsfolder and not in another sub-folder.Now you can run the command
node deploy-commands.jsand it should run successfully.Migrating events
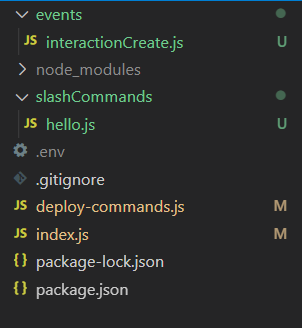
Create an
eventsfolder at the root level and in that folder create a fileinteractionCreate.js.Note: Please make sure the file name is exactly the same as above.
Your project structure should look like this
Copy paste the following code inside
interactionCreate.jsfile.exports.run = async (client, interaction) => { if (!interaction.isCommand()) return; const command = client.slashCommands.get(interaction.commandName); if (!command) return; try { command.execute(client, interaction); } catch (error) { console.error(error); return interaction.reply({ content: 'There was an error while executing this command!', ephemeral: true }); } };It is the same code we have inside
index.jswhere we listen for theinteractionCreateevent. Since we have moved the code here, we can remove the code fromindex.js.Reading commands and events in
index.jsCopy-paste the below code in
index.js. It is almost the same as before with a small change in the way we listened to the commands and the events.const fs = require('fs') const { Client, Collection, Intents } = require('discord.js'); const client = new Client({ intents: [Intents.FLAGS.GUILDS] }); client.slashCommands = new Collection(); const readSlashCommands = (arrayDirs) => { arrayDirs.forEach(dir => { fs.readdir(`./slashCommands/${dir}/`, (err, files) => { if (err) return console.log(err); files.forEach(file => { if (!file.endsWith(".js")) return; let props = require(`./slashCommands/${dir}/${file}`); console.log("Successfully loaded " + props.data.name) client.slashCommands.set(props.data.name, props); }); }); }); } readSlashCommands(['']) client.on('ready', async () => { var memCount = client.guilds.cache.reduce((x, y) => x + y.memberCount, 0); console.log(`Bot has started, with ${memCount} users, in ${client.channels.cache.size} channels of ${client.guilds.cache.size} guilds.`); }) fs.readdir('./events/', (err, files) => { if (err) console.log(err); files.forEach(file => { let eventFunc = require(`./events/${file}`); console.log("Successfully loaded " + file) let eventName = file.split(".")[0]; client.on(eventName, (...args) => eventFunc.run(client, ...args)); }); }); client.login(process.env.BOT_TOKEN);The function
readSlashCommandsworks on the very same logic as we wrote in thedeploy-commands.jsfile. Similarly, we are listening to the events such asinteractionCreatevia the code:fs.readdir('./events/', (err, files) => { if (err) console.log(err); files.forEach(file => { let eventFunc = require(`./events/${file}`); console.log("Successfully loaded " + file) let eventName = file.split(".")[0]; client.on(eventName, (...args) => eventFunc.run(client, ...args)); }); });which is very much similar to the command read code.
You can now run the respective command to start the bot and the console should look something like this.
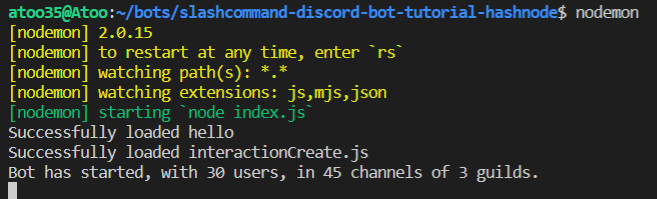
VOILA YOU HAVE DONE IT!!!
Support
If you liked my article, consider supporting me with a coffee ☕️ or some crypto ( ₿, ⟠, etc)
Here is my public address 0x7935468Da117590bA75d8EfD180cC5594aeC1582

Lets connect
Feedback
Let me know if I have missed something or provided the wrong info. It helps me keep genuine content and learn as well.


